What is LBPH?
LBP (Local Binary Patterns) is a feature extraction technique used to recognize or analyze textures in the field of image processing.
LBPH is a technique that combines LBP and a histogram (H).
LBP extracts features of an image by converting the pixel values around each pixel in the image into binary numbers, as shown in the image below.
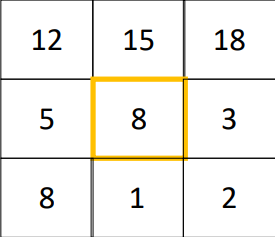
Binary numbers are generated based on the relative brightness difference between the center pixel and its neighbors.
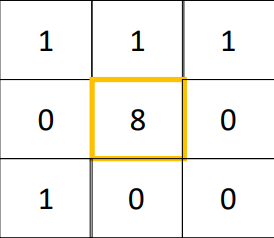
If the neighboring pixel’s value is larger than the center pixel’s value, it is represented as 1, and if it is less than the center pixel’s value, it is represented as 0, as shown in the image below.
Using these binary numbers, we can extract texture features for each pixel.
The image below shows the order of extracting binary numbers.

The result of the value extracted from the image is “11100010” in binary and “226” in decimal. That is, the value of the pixel surrounding 8 in the image is “11100010” in binary and “226” in decimal.
Also, this value does not change even if the brightness of the image is increased.
Extracting Local Binary Patterns (LBP) can result in specific patterns appearing in specific parts of an image.
It uses these patterns to recognize objects or faces in images.
How is LBPH applied to actual images?
Step 1

As you can see in the picture above, algorithm will create several squares.
It should be noted here that a square does not represent a single pixel, but is set with multiple pixels.
In this picture, each square has 12pixels. And then, apply LBP to obtain the value of the central pixel.
Step 2
Create a histogram, which represents statistics of counts of how many times each color appears in each square.
The image below is an example of a created histogram.

Step 3
Based on the comparision of the histograms, the algorithm identifies which part each square represents.
Example Code
There are two ways to recognize faces.
The first way is using OpenCV, and the second way is using dlib.
Implement by openCV
Training LBPH Classifier
1
2
3
4
# faces and ids: image and id values composed of numpy arrays extracted from a specific image.
lbph_classifier = cv2.face.LBPHFaceRecognizer_create(radius=4, neighbors=14, grid_x=9, grid_y=9)
lbph_classifier.train(faces, ids)
lbph_classifier.write('lbph_classifier.yml')
the result that written in ‘lbph_classifier.yml’ :
1
2
3
4
5
# threshold: 1.7976931348623157e+308
# radius: 1
# neighbors: 8
# grid_x: 8
# grid_y: 8
Parameters of LBPH
There are 4 parameters.
- radius : being used to build the circular local binary pattern and represents the radius around the central pixel.
- neighbors : the number of sample points to build the circular local binary pattern. the more sample points you include, the higher the computational cost.
- grid_x : the number of cells in the horizontal direction. The more cells, the finer the grid, the higher the dimensionality of the resulting feature vector.
- grid_y : the number of cells in the vertical direction. The more cells, the finer the grid, the higher the dimensionality of the resulting feature vector.
Recognizing faces
1
2
3
4
5
6
7
8
9
10
11
12
13
14
15
lbph_face_classifier = cv2.face.LBPHFaceRecognizer_create()
lbph_face_classifier.read('lbph_classifier.yml')
test_image = 'yalefaces/test/subject10.sad.gif'

image = Image.open(test_image).convert('L') # 'L' means convert .gif to image
image_np = np.array(image, 'uint8')

prediction = lbph_face_classifier.predict(image_np)
# prediction[0]: class
# prediction[1]: confidence(the higher value, the higher prediction)

cv2.putText(image_np, 'Pred: '+str(prediction[0]), (10, 30), cv2.FONT_HERSHEY_COMPLEX_SMALL, 1, (0, 255, 0))
cv2.putText(image_np, 'EXP: '+str(expected_output), (10, 50), cv2.FONT_HERSHEY_COMPLEX_SMALL, 1, (0, 255, 0))

cv2_imshow(image_np)
The result of codes above :

Implement by Dlib

As you can see in the image above, there are some common features in my implementation, such as five dots in the eyebrows and four dots on the nose bridge.